
How to Make Your Own Stash for $60-$100
- Aya S.
- Jun 10, 2020
- 6 min read

One of the most rewarding things is being able to use something you've made. While I enjoy making pads for others and for myself, I want to be able to share with you how to sew them yourself.
If you're interested in buying a professionally made cloth pad and you know how to/like to sew, here are some things I recommend doing and thinking about before making your investment.
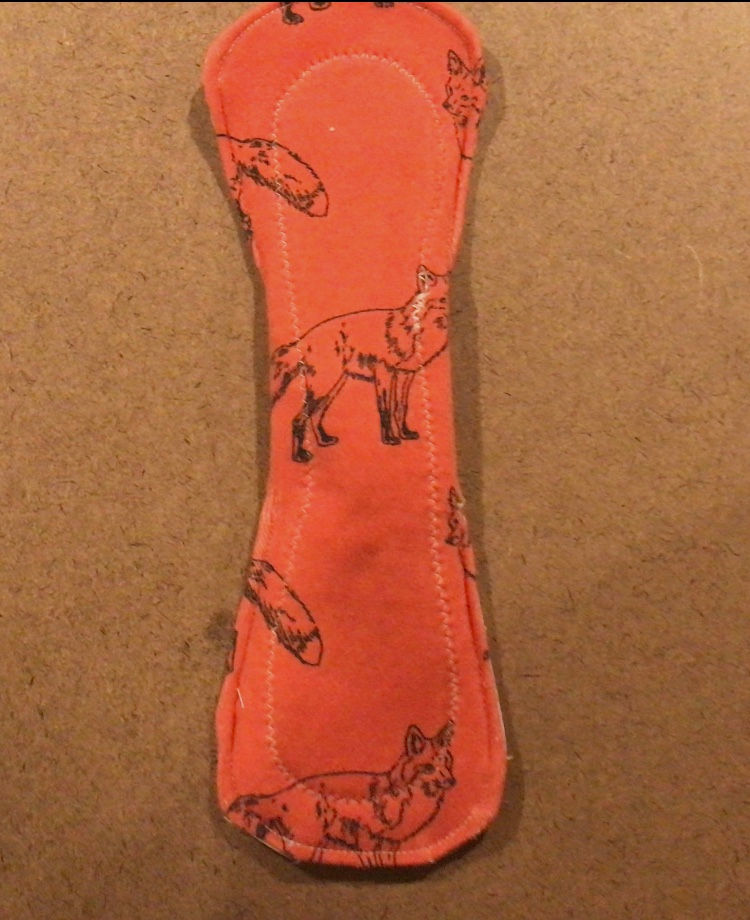
1) Zoom in on the photos.
You can tell a lot about the quality of a product and the experience of the sewer based on their display photos. The photo that they're showing should be the photo they're most proud of because that's what their buyers are judging. If their stitching doesn't look good you probably want to move on to someone else. There are also some sellers who only show the fabric and not the end product. In that case, I've messaged the seller to ask them to send me a photo of a complete product so I can better visualize what it will look like. They've all been very nice about it and sent me photos which either swayed me to buy it or turned me away.
2) Can I make it myself?
I'll only buy pads from people who clearly have a lot of experience with sewing or sewing cloth pads. If it looks like something I can make myself then why spend the money.
3) Can I find the fabric easily?
This goes back to point #2, but before I started buying pads, I would research the general fabrics I was interested in. I got a good since of how much the fabric is worth, how easy it is to work with, and how easy it is to get a hold of. With some fabrics like bamboo velour I'll just buy them from someone else. Bamboo velour is usually tie-dyed and some of the patterns people are able to create (like Vasha's Custom Creations and Tropickle) are so well done that I'm willing to spend the money on it. Sometimes fabrics only come in a yard and they're more expensive so it's worth-it buying a pad someone already made.
This could just be me, but I prefer to buy prints that are harder to find. When I see a print I like, I'll search it and it doesn't take long to find the original source. If it's something that can easily be bought then I'll either go out and buy the fabric to make it myself or I end up changing my mind and won't get it.

Materials you need:
1) Topper fabric (see "Fabrics for Reusable Pads" blog post)
Cheaper materials: 100% cotton, flannel (you can up-cycle old clothing)
More expensive materials: Minky, crushed velvet (be careful about quality), bamboo fleece (online only)
2) Core fabric (see "Fabrics for Reusable Pads" blog post)
Cheaper materials: Microfiber, flannel (you can up-cycle old clothing), old bath towels.
More expensive materials: Zorb (online only), bamboo fleece (online only)
3) Backer fabric (see "Fabrics for Reusable Pads" blog post)
Cheaper materials: Anti-pill fleece, flannel, micro fleece, PUL (Babyville brand )
More expensive materials: Soft-shell fleece (online only), WindPro (online only)
5) Builder's paper or crafting paper (large enough and stiff enough to make patterns)
6) A pad pattern of your choice
Let's start sewing!
Step 1: Pick a pattern you want.
There are many out there including free ones, but I highly recommend purchasing a pattern that's widely used by professional makers. I tried a free pattern online and it didn't go too well. Using these professional patterns reduce the pressure of not knowing if the pattern actually works and having to experiment with designing your own.
People usually go for Versodile (which I use) and The Happy Hippos. Both offer patterns as PDFs and have a variety of shapes and sizes.
Step 2: Cut out your patterns.
Step 3: Transfer the patterns onto stiff paper.
Having your patterns on a stiff surface instead of taping them together will make it much easier for you when you trace your pattern onto the fabric. You can also use plastic quilting template sheets or plastic table mats to transfer your patterns onto. If you're working with fabrics that have large prints, the plastic will allow you to see through so you can better align the prints in a way you want.
Make sure you don't use the outside of the pattern to measure the length! Use the inside seam allowance to measure it. What'll sometimes happen is you get a pad that's a bit smaller than the length you ordered. That's because the maker probably measured the outside of the pattern. When you sew, it makes the pad smaller by almost an inch when you turn it inside out.
Also make sure to add a tab on the wings that's between1/4 inch and 3/8 inch. This will be the opening where you can turn your pad inside out. Also make sure to cut the side of the tabs at a slight inward angle. When it comes time for you to top stitch the opening shut, the fabric will naturally fold right in and make your life much easier. Before, I didn't put the tabs on and it took me forever trying to fold the fabric in nicely. Then I added tabs but drew them at the wrong angle. Like before, it was almost impossible to fold them in nicely so I had to hand sew shut the opening first.
Step 4: Trace the pattern onto your fabric and cut it.
If you're working with fabric that wrinkles easily and can be ironed, make sure to iron it first before transferring your template onto it. .
Step 5: Trace your core and cut it.
If you're using multiple cores, sew those together before you attach them to the body of the pad.
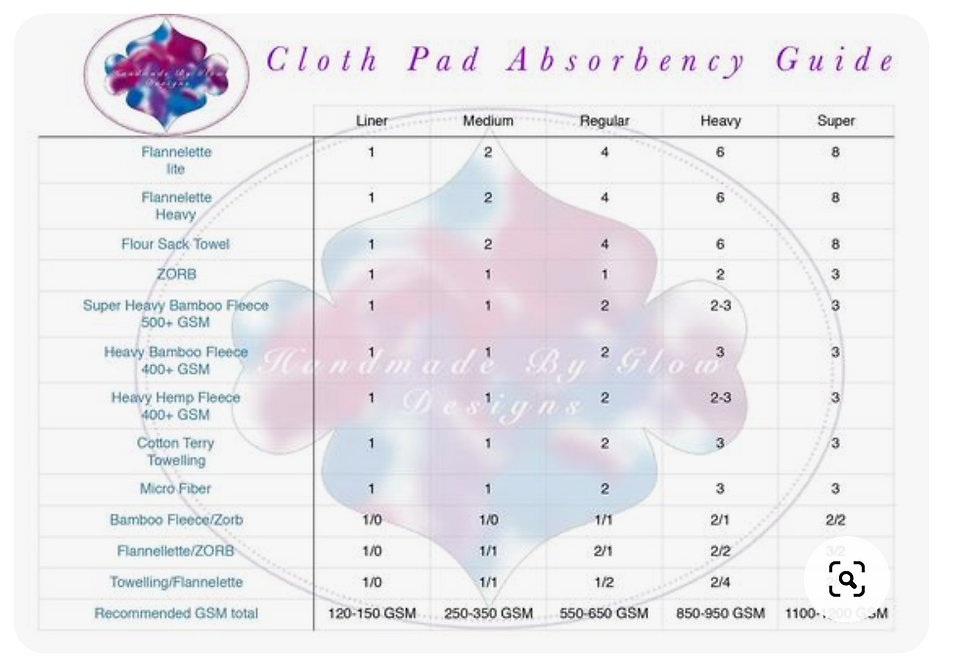
Some fabrics may be thin so you can duplicate the cores. Others such as the original Zorb are thick so you want to put the extra layer only where you need it or else your pad will become too bulky.

Follow this absorbency chart
If you're working with a flannel core, I would recommend using +6-8 layers.
Step 6: Pick the right foot for your material.
If you're working with knits or minky which are a pain in the butt to sew, I would highly recommend purchasing a walking foot. Knits slide easily and minky can start shifting as soon as you lay it onto another smooth surface. A walking foot enables the fabric to move along at the same time.
Step 7: Thread your machine.
Every machine is slightly different. I have an older Kenmore model and here's how to thread it.
If you need to make a bobbin and don't know how to, it's pretty straight forward. Here's a video showing you how to do it. Also, you can add more bobbin or different color thread onto thread that's already on the bobbin.
Step 8: If you have multiple layers for the core, pin them together and sew.
Use the zigzag stitch to make the stitching more secure. I like to use setting 3 for my stitches because they're not too long or short.
Step 9: Sew the core onto the back side of the topper.
Like before, use the zigzag stitch and sew on the edge of the foot.
Step 10: Cut out the PUL and pin the backer and topper right sides together. Then, sew!
PUL has a shiny laminated side which is the "wrong side" and a more matted side which is the "right side." I like to pin the topper directly onto the PUL and then cut it leaving extra space to ensure that all layers are being sewn together.
Some people swear by not using pins on PUL because it can tamper with the integrity of the fabric. Instead, they'll use these plastic clips.
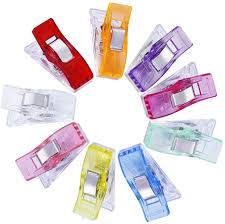
My snaps and pliers set came with a pack of these so I'll sometimes use them but I honestly don't think it's a huge deal because the part you're pinning is the part you're cutting off anyways.
From here on out, make sure you put your stitching back to a normal straight seam and not zigzag.
Step 11: Turn the pad inside out and then top stitch at 1/4 inch away from the seam.
Top stitching makes sure everything is securely sewn into place and closes the opening.
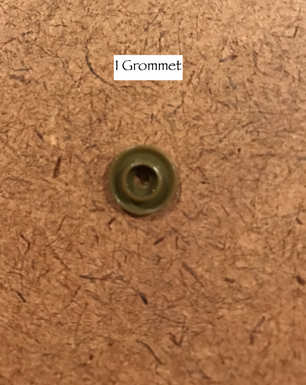
Step 12: Add the snaps.
Your snap set should come with a tool to poke holes into your fabric. Make a single hole toward the center tip of each wing. Or, you can fold your wings where you want them to be when you clasp them and then poke a hole through both wings at the same time.


To ensure that I hear a snapping sound when I clasp the buttons, I'll place the bottom of the snap pliers on the table and put in some body weight as I press down. If there's not enough pressure I've found that the snaps won't clasp properly.
If you mess up with the placement of the snaps or you face the grommets in the same direction, don't worry because I'll show you an easy way to fix it. Use pliers and pinch the thumbtack-like grommet until it breaks in half.
Now you're done!!


Comments